If you missed Parts 1 and 2, they are here (part 1) and here(part 2)
Ok, you have a lot of strips of cloth and a lot of triangles. Today we will combine a few. But first, lets talk about sewing.
When you put the pieces together, you're going to want to put the "good" side of the fabric pieces facing each other. This makes sure that your seams are on the inside, so your quilt doesn't look all funky and frazzley. We also need to measure carefully where 1/4" from the POINT of the sewingmachine needle is on both sides of the sewingmachine platform. You want to be certain you are only using 1/4 inch seams, because that will help you to "match points" by keeping the pieces all the same size. I have used a piece of pink paper and tape to mark my machine.

If your fabric seems to fray easily, sew once with a 1/4" seam, then sew again INSIDE the seam to give it double strength.
Keeping the 1/4 inch seam allowance consistant is also important so that we don't get that "off by just a bit" problem that multiplies on us. Keep your cutting tools handy, we will use them again today as well.
OK! Off we go. First off, you should have 12 pieces each of A and C that are about 45 inches long and exactly 2 1/2 inches wide. Starting with these, put 2 strips face-to-face (right sides together) and sew a nice straight 1/4 inch line all the way down ONE LONG side. When you get done, you should have a 4 1/2 inch by ~45 inch long skinny strip. It is possible that one or the other of the fabrics will be longer than the other color. This is ok. Just put the long strips together and cut off any extra length when you're done, before you iron it.
Do the same with all the other 2 1/2 x 45 inch pieces of A and C. You will end up with 12 long two-tone pieces.

A note about ironing.
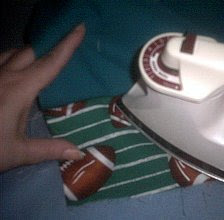
When you have sewn ANY two pieces together, make sure you iron them after. Iron the seam allowance toward the DARKER of the colors. Don't wiggle the iron around when you iron. This makes the seam wiggly. You want them to be straight. I usually will hold the piece open with my fingers, guiding the iron toward the seam and sliding SLOWLY and GENTLY across the fabric, then hold for a couple seconds and remove the iron.

Iron all 12 of your pieces.
Now square up the corners on one end of the long strips, and then cut them into 4 1/2 x 4 1/2 inch two-tone squares.

The goal is to have 100 horizontal-two-tone 4 1/2 inch squares. There will be excess - just put it to the side.
Ok! That's all for this week. Hope it all goes well for everyone. Please - if you have any questions at all, post a comment and I'll get back to you within 24 hours!
2 comments:
Hi Sew, I am printing part 3. The instructions are so easy to read and understand.
You have nice hands.
*chuckle*
Thanks.
Post a Comment